En este tutorial vamos a tener nuestra primera toma de contacto con un Joystick en Arduino, lo único que haremos sera mostrar por el Serial monitor la coordenada (x,y) y el estado del pulsador.
Un joystick es un dispositivo que dispone de una pieza central que pivota sobre su base y permite informar del ángulo de inclicanción o desplazamiento lineal, normalmente la información que da se refiere a 2 ejes.
El pulsador es digital, pero el resto es analógico, por lo que al pivotar recibiremos un valor para el eje x y otro para el eje y, ambos oscilando entre 0 y 1023, si no tocamos el joystick este debería dar un valor medio cercano a 512, digo cercano porque depende de su calibración lo dará más o menos cercano.
Que necesitamos:
1 Placa Arduino Uno
1 Módulo Joystick
Cables para realizar las conexiones
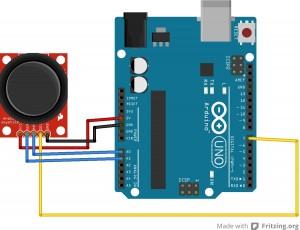
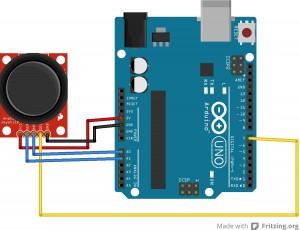
No hay mucho que explicar aquí, los pines vienen marcados así que el de vcc va a 5V, tierra a GND, la patilla sw va al pin digital y las encargadas de los valores del eje X y eje Y van a dos pines analógicos, tal que así:

Código fuente:
const byte pinX = A0;
const byte pinY = A1;
const byte pinButton = 7;
void setup(){
  Serial.begin(9600);
  pinMode(pinButton,INPUT);
  digitalWrite(pinButton,HIGH);
  pinMode(pinX,INPUT);
  pinMode(pinY,INPUT);
}

void loop (){
  int coordX = analogRead(pinX);
  int coordY = analogRead(pinY);
  boolean buttonState = digitalRead(pinButton);
  Serial.print("Coordenada X: ");
  Serial.print(coordX);
  Serial.print(" Coordenada Y: ");
  Serial.print(coordY);
  Serial.print(" Pulsador: ");
  Serial.print(buttonState);
  Serial.println(" ");
}
Lo primero que hacemos en el void setup() es declarar los pines que vamos a usar y abrir la comunicación serie y en el void loop() leemos los pines y mostramos su valor en el monitor serial, si no os gusta que muestre un valor de 0 a 1023 podeis mapearlo a vuestro gusto.
style="display:inline-block;width:728px;height:15px"
data-ad-client="ca-pub-3868159888315364"
data-ad-slot="7639712738">
In this tutorial we will have our first contact with a joystick in Arduino , all we will do will be to show the Serial monitor the coordinate (x , y) and the state of the button .
A joystick is a device that has a centerpiece that pivots on its base and informs of inclicanción angle or linear displacement, usually giving information relates to 2 axes.
The button is digital, but the rest is analog , so when swinging we will receive a value for the x-axis and other axis for the y-axis, both ranging between 0 and 1023, if we do not touch the joystick it should give a value close to 512, I say close because depending of its calibration it will give a closer value.
We nned:
1 Arduino Uno board
1 Joystick module
Cables for connections
Not much to explain here , the pins are marked so the vcc will be at 5V, GND to GND , the SW pin goes to digital pin and responsible for the values of X axis and Y axis are two analog pins , such like this:

Source code:
const byte pinX = A0;
const byte pinY = A1;
const byte pinButton = 7;
void setup(){
  Serial.begin(9600);
  pinMode(pinButton,INPUT);
  digitalWrite(pinButton,HIGH);
  pinMode(pinX,INPUT);
  pinMode(pinY,INPUT);
}

void loop (){
  int coordX = analogRead(pinX);
  int coordY = analogRead(pinY);
  boolean buttonState = digitalRead(pinButton);
  Serial.print("Coordenada X: ");
  Serial.print(coordX);
  Serial.print(" Coordenada Y: ");
  Serial.print(coordY);
  Serial.print(" Pulsador: ");
  Serial.print(buttonState);
  Serial.println(" ");
}
The first thing we do in the void setup () is to declare the pins are going to be used and open the serial communication and in the void loop () we read the pins and show its value in the serial monitor, if you do not like to show a value from 0 to 1023 you can map it to your liking.
style="display:inline-block;width:728px;height:15px"
data-ad-client="ca-pub-3868159888315364"
data-ad-slot="7639712738">

