Tutorial creado para Todoboda.
This tutorial was created for Todoboda.
Hace un tiempo os mostrábamos cómo utilizar unas plantas para hacer un seating plan diferente con palos de madera y washi tape. Hoy queremos ofrecer dos opciones sencillas para darle un toque a esas macetitas y quedar estupendamente con vuestros invitados.
Some time ago we posted how to use little plants, wooden sticks and washi tape to make a different seating plan. Today we would like to show you two simple ways to give a different touch to those flowerpots and make a very good impression to your guests.
Los materiales que vamos a utilizar son los siguientes:
- · Macetas pequeñas
- · Papel kraft (o cualquier otro papel que os guste)
- · Etiquetas precortadas
- · Cinta de doble cara
- · Para la primera de nuestras propuestas necesitaréis además lazo y para el segundo un poquito de cuerda y papel estampado. Nosotros hemos utilizado papel pintado, pero puede ser papel de regalo o cualquier otro papel con un estampado que os guste.
- · Little plants
- · Kraft paper (you may use any kind of paper you like)
- · Cut up tags
- · Double-sided tape
- · Some ribbon for the first of our options and some string and patterned paper for the second one. In that case we used wallpaper but any other patterned paper may be used.

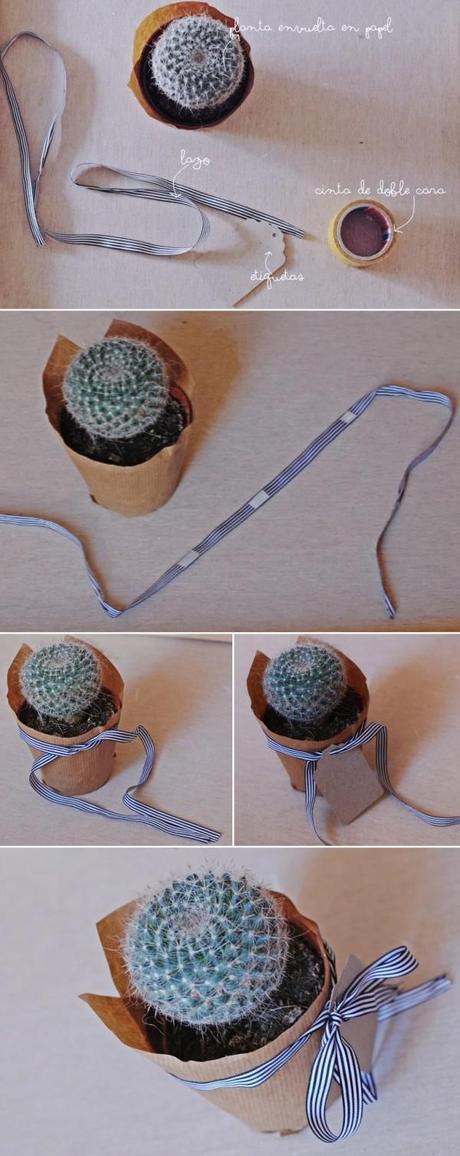
En primer lugar vamos decorar la maceta con un sencillo lazo y colocaremos una etiqueta para agradecer la asistencia de nuestros invitados.
In this example, we are going to decorate the flowerpot with a simple bow and and tag to thank your guests for being there with you.
1. Para asegurarnos que el lazo no se cae, colocaremos trocitos de cinta de doble cara en el lazo y lo colocaremos sobre el papel kraft que cubre la maceta.
1. To make sure bow doesn’t fall out, stick tiny pieces of double-sided tape in the ribbon an stick it to the kraft paper that is wrapping the flowerpot.
2.Después solo tenemos que introducir la etiqueta por uno de los extremos del lazo y terminar con una lazada.
2. Then, just insert the tag through one of the ribbon’s ends and then tie a bow.

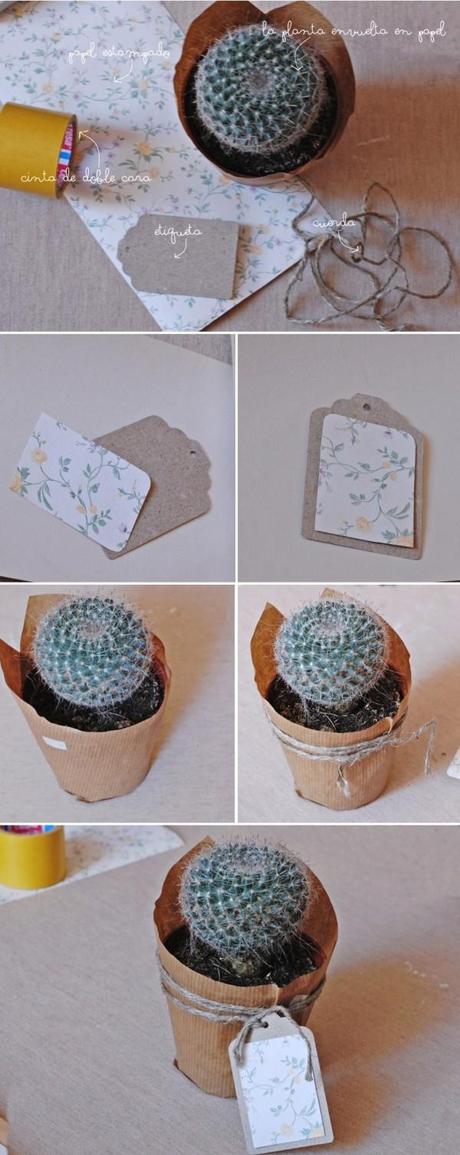
En este caso vamos decorar la etiqueta y la colgaremos con un poquito de cuerda.
In this second DIY, we are going to decorate the tag and then tie it to the plant with a little string.
1. Para preparar las etiquetas, recortaremos el papel con el que vamos a decorarlas y los pegaremos a la etiqueta.
1. Cut the patterned paper you have chosen to decorate the tag and stick it.
2. Para montar la maceta, esta vez, pegaremos trocitos de cinta de doble cara directamente sobre el papel kraft en el lugar donde vamos a colocar la cuerda.
2. This time, stick tiny pieces of double-sided tape right in the kraft paper, just in the place where we are going to wind the string.
3. Daremos vueltas pegando la cuerda a la cinta y asegurándonos de que no se vea. Para finalizar colgaremos la etiqueta que hemos preparado.
¿Qué os ha parecido?
3. Wind string around the flowerpot, and stick it to the pieces of tape making sure they get perfectly covered. To end this up, hold the tag we have previouly prepared. Did you like it?

