(scroll down for English)
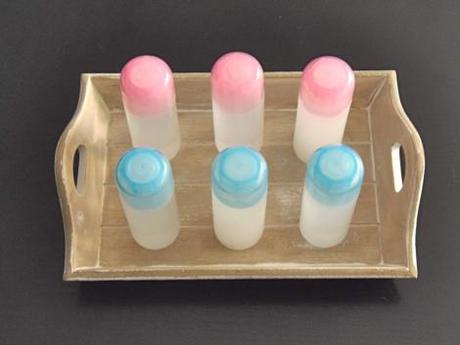
Estos son los cilindros térmicos que he preparado en casa. Me hice con unos botecitos de plástico con tapones de dos colores y los he utilizado para hacer estos cilíndros térmicos y también los cilindros sonoros, los cilindros olfativos y los cilindros gustativos, que ya os iré enseñando en sucesivos posts (si no os lo queréis perder os podéis suscribir al blog aquí, es gratis!)
En este caso simplemente tuve que llenar los cilindros con agua, puse dos (uno de cada color) en la nevera, otros dos los dejé a temperatura ambiente y otros dos los llené con agua caliente justo antes de utilizarlos. Cómo era la primera presentación de esta actividad sólo utilicé tres parejas de cilindros, pero a medida que el niño vaya afinando su capacidad de diferenciarlos se pueden ir añadiendo más cilindros con temperaturas intermedias.
La actividad consiste en presentar al niño los cilindros, indicándole que se llaman “cilindros térmicos” y ofrecérselos desordenados para que los empareje según su temperatura. Podemos aprovechar para comentar los conceptos de frío, templado y caliente. Un paso más allá sería clasificar las parejas de cilindros de más frío a más caliente (o viceversa).
Un detalle más: para que el material sea autocorrectivo tenemos que añadir un “control de error”, para ello podemos marcar cada pareja con un color en la pare de abajo del cilindro. De este modo el niño podrá comprobar si ha emparejado bien los cilindros sin que nosotros tengamos que corregirle.
—————
These are the thermic cylinders I have prepared at home. I got some little plastic jars with lids in two colors and I used them to make these thermic cylinders and also the sound cylinders, smelling cylinders and tasting bottles, which I will be showing you in later posts (if you do not want to miss it you can subscribe to the blog here, it’s free!)
In this case I just had to fill the cylinders with water, keep two (one of each color) in the fridge, leave two at room temperature and fill the others with hot water just before use. As this was the first presentation of this activity we only used three pairs of cylinders, but as the child refines their ability to differentiate them, we may add more cylinders with intermediate temperatures.
The activity is to introduce children to the cylinders, indicating that they are called “thermic cylinders” and offer them mixed for the child to match the couples according to their temperature. We can discuss the concepts of cold, warm and hot. A step further would be to classify the pairs of cylinders colder to hotter (or vice versa).
One more thing: in order to make the material self-correcting we need to add a “control of error“, for that we can mark each pair with a color on the bottom of the cylinder so the child can check if he paired the cylinders right without us having to correct him.


