Para poder servir trafico a través de HTTPS en un servidor Nginx en Linux Ubuntu necesita un certificado SSL, lo mejor es usar un certificado Let's Encrypt, a continuación te detallo el procedimiento para lograrlo.
Primero instala Let's Encrypt con los siguientes comandos.
Los comando anteriores instalaran la herramienta certbot que es la que nos permitirá instalar el certificado.
El comando para generar el certificado es el siguiente, sustituye el dominio *.example.com por el tuyo.
Cuando ejecutes este comando te llevara a una parte en la que te pedira que agregues unos registros tipo TXT con cierto texto como se muestra a al final del siguiente ejemplo
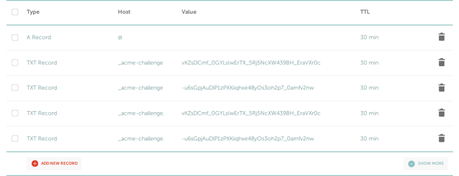
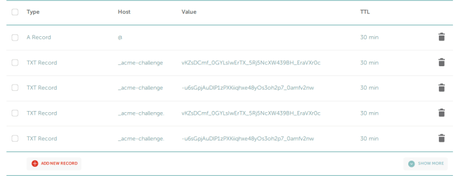
ving debug log to /var/log/letsencrypt/letsencrypt.log Plugins selected: Authenticator manual, Installer None ------------------------------------------------------------------------------- Would you be willing to share your email address with the Electronic Frontier Foundation, a founding partner of the Let's Encrypt project and the non-profit organization that develops Certbot? We'd like to send you email about EFF and our work to encrypt the web, protect its users and defend digital rights. ------------------------------------------------------------------------------- (Y)es/(N)o: y Obtaining a new certificate Performing the following challenges: dns-01 challenge for example.com ------------------------------------------------------------------------------- NOTE: The IP of this machine will be publicly logged as having requested this certificate. If you're running certbot in manual mode on a machine that is not your server, please ensure you're okay with that. Are you OK with your IP being logged? ------------------------------------------------------------------------------- (Y)es/(N)o: y ------------------------------------------------------------------------------- Please deploy a DNS TXT record under the name _acme-challenge.example.com with the following value: x4MrZ6y-JqFJQRmq_lGi9ReRQHPa1aTC9J2O7wDKzq8 Before continuing, verify the record is deployed.Son 2 registros, te muestro en la imagen siguiente un ejemplo de como agregarlos en tu zona DNS.


Una vez los agregues en tu DNS espera unos 5 a 10 minutos para que se propaguen, luego continua con el proceso de instalación de el certificado y veras un resultado de éxito como el siguiente.
IMPORTANT NOTES: - Congratulations! Your certificate and chain have been saved at: /etc/letsencrypt/live/example.com/fullchain.pem Your key file has been saved at: /etc/letsencrypt/live/example.com/privkey.pem Your cert will expire on 2020-01-09. To obtain a new or tweaked version of this certificate in the future, simply run certbot again. To non-interactively renew *all* of your certificates, run "certbot renew"El mensaje anterior te confirma que el certificado ya fue instalado, este es valido por 3 meses hay que agregar a cron una tarea con el comando siguiente.
Agrega la siguiente linea.
0 1 * * * /usr/bin/certbot renew >> /var/log/letsencrypt/renew.logAhora cierra y graba.
Ahora abre el archivo de configuración de tu host virtual de Nginx, la ruta podría ser como la siguiente /etc/nginx/sites-available/wordpress
Donde el /wordpress es el host virtual, sustituyelo segun sea tu caso, sustituye el contenido del archivo con lo siguiente.
server { listen 80; listen [::]:80; server_name *.example.com; return 301 https://$host$request_uri; } server { listen 443 ssl http2; listen [::]:443 ssl http2; root /var/www/wordpress; index index.php; server_name *.example.com; if ($host != "example.com") { return 301 https://example.com$request_uri; } ssl_certificate /etc/letsencrypt/live/example.com/fullchain.pem; ssl_certificate_key /etc/letsencrypt/live/example.com/privkey.pem; ssl_trusted_certificate /etc/letsencrypt/live/example.com/chain.pem; ssl_protocols TLSv1 TLSv1.1 TLSv1.2 TLSv1.3; ssl_ciphers 'TLS13+AESGCM+AES128:ECDHE-ECDSA-CHACHA20-POLY1305:ECDHE-RSA-CHACHA20-POLY1305:ECDHE-ECDSA-AES128-GCM-SHA256:ECDHE-RSA-AES128-GCM-SHA256:ECDHE-ECDSA-AES256-GCM-SHA384:ECDHE-RSA-AES256-GCM-SHA384:DHE-RSA-AES128-GCM-SHA256:DHE-RSA-AES256-GCM-SHA384:ECDHE-ECDSA-AES128-SHA256:ECDHE-RSA-AES128-SHA256:ECDHE-ECDSA-AES128-SHA:ECDHE-RSA-AES256-SHA384:ECDHE-RSA-AES128-SHA:ECDHE-ECDSA-AES256-SHA384:ECDHE-ECDSA-AES256-SHA:ECDHE-RSA-AES256-SHA:DHE-RSA-AES128-SHA256:DHE-RSA-AES128-SHA:DHE-RSA-AES256-SHA256:DHE-RSA-AES256-SHA:ECDHE-ECDSA-DES-CBC3-SHA:ECDHE-RSA-DES-CBC3-SHA:EDH-RSA-DES-CBC3-SHA:AES128-GCM-SHA256:AES256-GCM-SHA384:AES128-SHA256:AES256-SHA256:AES128-SHA:AES256-SHA:DES-CBC3-SHA:!DSS'; ssl_prefer_server_ciphers on; ssl_session_cache shared:SSL:50m; ssl_session_timeout 1d; ssl_session_tickets off; ssl_ecdh_curve X25519:sect571r1:secp521r1:secp384r1; client_max_body_size 100M; autoindex off; location / { try_files $uri $uri/ /index.php?$args; } location ~ \.php$ { include snippets/fastcgi-php.conf; fastcgi_pass unix:/var/run/php/php7.4-fpm.sock; fastcgi_param SCRIPT_FILENAME $document_root$fastcgi_script_name; include fastcgi_params; } }Sustituye *.example.com y /var/www/wordpress segun sea tu caso, graba y cierra el archivo y reinicia Nginx y php con los siguientes comandos.
sudo systemctl reload nginx
sudo systemctl reload php7.4-fpm
Listo ahora puedes probar ingresar a tu sitio a través de una navegador usando el protocolo https con la dirección como https://example.com
