Double-cheeseburger. That's what the new KOM Cycling RPV2 rocker plate is, or at least, looks like. This double-decker rocker plate essentially takes their existing popular RPV1 rocker plate (which tilts side to side), and adds a new forward/back sliding sensation - in the same vein that Saris's MP1 plate does.
The concept behind rocker plates is to give you indoor training sessions more movement, which in turn roughly translates to more comfort. Out on the road you're constantly shifting slightly on the saddle as the bike moves - but indoors you're riding a brick that rarely moves meaningfully. Thus, you'll mostly notice the difference on longer rides. But still, on shorter rides you'll simply notice that you're not a brick. However, an astute cycling tail watcher will also notice that you 'invert' the way you sprint indoors on a rocker plate. And yup, I'll cover that too.
The transition from single to double-cheeseburger has doubled the price though, from $449 for the RPV1 to $799. So, not exactly double, but getting there. Still, that's some $400 less than the equally woody Saris MP1. So...how do they compare? Let's dig in.
Note that KOM Cycling sent me a media loaner of the RPV2 to test out. After this review they'll have to figure out how to get it back to them. That's just the way I roll. If you found this review useful, consider becoming a DCR Supporter, which helps the site here and basically just makes you awesome.
Unboxing & Setup:
The KOM Cycling Double-Cheeseburger arrives in one large piece, looking like the top of a paper airplane. Albeit, a heavy one at 66 pounds/30kg. Inside,XXX
To make your life easier later, position the box label-side up, and then remove the top of the box. Assuming everyone did their jobs correctly, you'll have the top plate of the rocker plate looking back at you.
You can now pretty easily slide (or rip) the plastic bag off, and then slide the cardboard out from under it. When all is said and done, you should find yourself one rocker plate double-stack, and one oversized Ziploc bag with balls inside.
Inside that bag we have four deflated balls. We'll only use two of them, the other two are in case...well...I guess in case you screw up somehow and blow up your balls. You'll also find a pile of 7 straps, a level, and a cheap inflation pump. Frankly, the red level might be the best party freebie of this entire kit.
Setup is silly easy. If you can pump up a soccer ball (or, football), then you can set up RPV2. I mean, at least assuming you don't go all Tom Brady on it.
Essentially, you're gonna use the pump to inflate two balls, inserting them into the two round ball-shaped holes. These will act as the resistance for left/right tilt. You'll be astounded just how big these balls will get, despite being made of super-thick rubber (or silicone or something). You can see below I've inserted one ball into the left and right sides, and have put a bit of air in the right side. I'm just starting to pump up the left side.
When you do this, it'll behoove you to ensure the inflation holes of the ball are centered. First, it'll look pretty later, but second, it'll mean that as they inflate, the ball hole won't go somewhere harder to reach later for inflation or deflation.
You'll want to also ensure that your balls stay centered below deck as you blow them up. Thus, you'll reach around and adjust your balls to provide for consistency between them, ultimately ensuring the situation is level.
In my case I used the level most of the time throughout this process, and eventually you'll add the trainer too. The goal here is that when you stand on either edge of the platform, you've got enough air that the two platforms 'just touch'. If you have too little air, then you could hit the boards together when you tilt. That wouldn't likely damage anything, it just wouldn't feel terribly awesome. Inversely, if you have too much air, then it'll feel too stiff.
What's arguably the most impressive part here is just how darn big these balls get below deck. Check this out:
They're massively larger than the above-deck ball size.
And with that, it's time to throw your trainer on there. Doing so is quick and easy. You can use the straps to get your trainer nice and centered. There's seven straps, and I used three on my KICKR. And then one more for my front wheel. You'll see grooves throughout the platform, allowing you to connect up just about any trainer or smart bike you can think of.
And then up front you'll use a strap for your wheel. Pro Tip: Don't put the buckle on the center point of the wheel, instead situate it off to one side. First, it's not good for the carbon/material, but second, it'll create scratches or noises if it moves across the edge.
In my case, I used the platform almost entirely with a Wahoo KICKR. But it's compatible with basically everything out there. They officially claim compatibility with the entire Wahoo KICKR lineup (including CORE & SNAP), the Tacx NEO/Flux/Flow series, the Saris M2 series, and "most other trainers".
Realistically speaking, basically everything is compatible with it. People have tossed on KICKR bikes too. Though, that's a bit iffy, but hey, it works. It also works with the KICKR CLIMBXX, I did that too for one ride. In that case you can either free-style it on the front without a strap (your weight is more than enough), or, you can use two straps together. The only downside to straps (I didn't use straps) is that it can slightly restrict the tilting base of the KICKR CLIMB, so don't pull it too tight.
Finally, two random spec things. First is that the bottom of the plate actually has small rubber feet on it, to keep it from scratching your floor. In my case, I placed it on a trainer mat anyway. And lastly, the max allowable on-deck weight is 425lbs/193kg. So that's even enough to accommodate a KICKR Bike + most riders.
How it Works and Usage:
With everything all set it's time to get atop the platform and your bike. The first time you do this you'll probably assume you'll tip over and die. And while that's always a possibility, it's mostly an unlikely one. To demonstrate this, here's me on the platform, leaning quite far to the wall side (without touching the wall, you see my hands being held up).
Now mind you, if I were to lunge harder, I could probably take the whole thing airborne, but that'd be stupid. And I only do stupid things on Friday. Today is a Tuesday, thus, free of stupidity. But before we get to all the tilts and slides, lets step back and briefly talk about the non-slip surface on the edges. You'll see this in all the places that both the trainer/wheel is likely to sit, as well as where you're likely to step. Though, some smaller riders might find the gap nearer the crankset (where it says "CYCLING") lacking in grippy stuff. In my case, it wasn't where my feet tended to land though.
Somewhat surprisingly, while the Saris MP1 anti-slip grippy stuff is more grippy, I actually like the KOM cycling material better for cleaning purposes. The Saris stuff is hell to clean if you actually get something on it (like gel or squished Haribo). Whereas the KOM material is easier to clean while still being grippy enough.
Now aesthetically speaking, I love the KOM Cycling red/black look - because it matches my bike...and my shoes...and my kit....and my water bottles. Also, my Apple TV remote case. But looks are individual, and some people may prefer the more woody look of the Saris MP1. To each their own.
However, I haven't seen any issues with the wood surface and sweat, despite letting sweat just pool up there post-ride and leaving it there. Perhaps long term, but I also haven't heard of issues there on other plates that have a protective coating applied as this does. So, boring stuff done, let's talk movement.
The RPV2 moves in two main directions: Side to side tilting, and front/back sliding. It's the front/back sliding that's unique on the RPV2 compared to the RPV1 (which only does tilting).
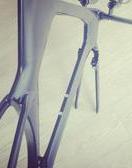
In the case of front/back movement, the platform is essentially rolling on flat metal tracks, one at the front and two at the rear sides (like airplane wheel bays). This interaction occurs between the base and the middle platform. There's then two sets of springs that extend outwards from roughly below your crotch towards the sides. These apply a force that bounces the plate back in place when moved forward/back. Here's the tracks:


Also, about now you're noticing it's a bit of a dust magnet underneath. On top it's not too bad if you remember to wipe it down.
And here you can see the springs.
Here's roughly where the two springs are:
Now these rails and springs are notably different from a front/back standpoint than the Saris MP1. In that case, it uses a curved track (seen below), to basically provide that resistance using your body weight instead of springs. And in fact you're really talking the total weight of your body + trainer + platform to drive the rollers back to the center point. As a result, the MP1 has a slightly more natural feel.
The other difference is that you're more likely to hit the edges (front/back) on the RPV2 than the MP1, during a sprint. That's because while the track lengths aren't that different, it takes far more effort to move it the full extent on the MP1 than the RPV2. Now, is that worth the price difference? Meh, probably not for most, but, it's probably the single biggest difference.
Still, if we set aside the sprint edges, for normal riding, you'll get very gradual front/back movement as you apply slight bits of acceleration or deceleration. This is the main difference between this (or the MP1) and any other platform on the market that's just side to side. Effectively it means that every pedal stroke generates a very slight bit of 3D movement - front to back as well as side to side. Just as you'd generate 3D movement outside on a bike (even if that movement is slightly different here).
Next, we've got the side to side tilting motion. In this case the platform is leveraging the resistance provided by the air-filled balls for that movement. The tilting occurs between the top platform and the middle platform. Thus, the middle platform acts as the base and doesn't tilt itself, only the top platform tilts, as seen below:
You can effectively control the amount of tilt by the amount of air you put in the balls. Unfortunately, without a pressure gauge on the provided pump you're entirely freewheeling it. But, if you've got a needle for your bike pump, then you can get more precise about it. The top two panels are connected using five rubber isolation mounts that give it its flex. You can see these down the center of the platform in black:
Following their instructions, this gives me a total max platform tilt of 7° at the base of the platform, which is most easily found by simply standing on the edge. Realistically speaking, you won't tilt this much sitting on the bike unless you're about to try and tip it over.
I then placed the level up higher - on my saddle. Would that result in any greater tilt angle (given the higher altitude)? Yes, a bit, it recorded 9° up there:
Still, this is short of the official 13° of official movement per their current spec sheet.
As noted earlier, the platform is pretty darn stable - even for me, a tall dude on a tall bicycle. I leaned as far as I could towards the wall on the bike, and it wouldn't tip there. Which isn't to say you couldn't get it to tip ever. I'm sure someone with more balls than I would do some jiggling and such while leaning obtusely towards the wall to get it to flip. But again, I reserve my stupidity for Friday, and today is not Friday.
Ok, so with all that explainer and stuff covered, how does it actually feel? Pretty darn good. At least, as usual with these sorts of plates - if we're not sprinting. As I mentioned earlier, the main appeal with rocker plates in my opinion is really just long rides and lots of saddle time, specifically introducing that slight bit of movement that makes it not only feel more realistic but also gives your ass some relief due to those micromovements.
Now, one issue, just like with the MP1 (and every other rocker plate) is sprints. In this scenario, the movements indoors on the rocker plates are opposite what happens outdoors. Like opposite day. See, outdoors when your right foot/leg goes down, your bike/body will naturally lean to the left. But on a rocker plate by default, the opposite happens, the bike leans right - it's hard to see it in a still shot like below, but super easy to see in the video at the start of the post.
As anyone in the rocker plate community or industry will quickly remind you, you can fix this by 'learning' how to sprint indoors on a rocker plate, which roughly involves using your arms to counterbalance. And that's OK- to an extent. But I'm going to repeat exactly what I said in my original Saris MP1 review:
I think it's completely fine that the experience of sprinting indoors is different on a rocker plate than the real world. Just like racing a crit in Zwift is different in various ways than racing a crit outside. There are things you must account for inside in Zwift that you don't account for outside. And vice versa. So, if one wants to learn how to sprint properly indoors - that's totally cool.
However, where I have an issue is when a company/individual represents a rocker plate product as being "just like outdoors". Which, it isn't. That newly learned skill to sprint/climb indoors won't translate outdoors - because your body already knows how to ride a bike outdoors (hopefully). Thankfully most companies these days don't actually make any claims like that here. Most reputable companies are open that there's differences between the two.
And again - don't misunderstand me: Go forth (if you want) and learn how to sprint on a rocker plate. I have zero issues with that. Just don't tell other people that they "need" to learn how to do that. Got it? Good.
Finally, in the miscellaneous category, a few random things. First off, the RPV2 does make a bit of noise when it's rocking around. Like doing the horizontal shuffle on an older bed, you'll hear the springs below the platform more loudly in certain more aggressive movements. But you'll also hear them slightly with just gentle movements. This is because they're constantly expanding and compressing, and for whatever reason, they aren't absolutely silent. It's less noise than your bike drivetrain likely is, but it's not as virtually silent as the MP1. Additionally, the bearings that are within the rails aren't silent either. Again, very minor amounts of noise, but worth pointing out.
Still, despite these minor quirks - overall it's a really good option. The overall feel is is good, especially for more steady-state riding. If you're like me, who doesn't hard explosive sprint a ton (except of course in the last 5 seconds of a group ride to move from 98th place to 97th place), it's a great option. Whereas if you're someone who is constantly sprinting pretty aggressively and is a heavier rider (like me), you might find the springs reach the end too often and too abruptly.
But for everyone else, especially triathletes who are more steady-state in training, it's a great compromise to save $400 compared to the Saris MP1.
Product Comparison Thoughts:
There are roughly three types of people in this world:
A) Those that want to build their own rocker plates
B) Those that just want to buy a pre-made rocker plate
C) Those that want nothing to do with a rocker plate
For the first category - more power to ya. KOM's initial rocker plate, the RPV1, was essentially a rebranded RideNow plate - offered under many other brands/names too. Arguably, KOM Cycling's paint job and marketing was what sold it more broadly in the US. However, the RPV2 is fully new to them at this point, though also from RideNow based on some of their social media posts. It appears to be sold directly from them in some Asian markets, but t's a bit fuzzy exactly.
Either way, when it comes to the home-built crowd, for the most part it's heavily in the tilting side to side realm. Some have done more complicated designs, but very few. It's one thing to add some tennis or inflatable objects to a few pieces of wood, but it's an entirely different ball of wax to also have fore/aft movement. Again, some impressive peeps have accomplished this, but that list is very small.
So that then gets you to ready-made options. In the side-to-side tilting market, there's tons of options by tons of companies. However, once you add forward/back movement, that gets slim quick. In my case, I've only tested two units that fall under that category: The Saris MP1 & the KOM RPV2. Thus, I'm not going to make comments about other designs, because I simply haven't ridden those other designs.
In terms of comparing the Saris and KOM offerings though, they're similar - yet clearly different. The build quality of the KOM RPV2 is perfectly fine, quite good in fact. But it's also clear that the build quality of the Saris MP1 is definitely higher. There's no slight squeaking of springs below-deck, nor any balls to inflate. And they include a front wheel block to ensure perfect alignment.
Would most people notice however? Probably not - except for the harder stop on the ends of the sprints, as I noted.
But inversely, I actually preferred the grip material on the KOM Cycling unit, as well as the strap design. And while the Saris MP1 strap design is clearly a better engineered solution, for someone like myself changing around trainers somewhat frequently, the KOM unit is actually easier in that regard. But if you're leaving your trainer on there all the time, then the Saris design is great. Neither ever moved on me though.
Like I said, the differences are minor - so ultimately you've just gotta decide what features you prefer the most and what you want to pay.
Overall, I'm pretty happy with the RPV2 in terms of overall ride feel and the full motion aspects. As I keep harping on, the value here is really more of the flowy movement as you work your way through a ride, rather than ultra-realistic outdoor sprint replication. But with that flowing movement with small accelerations and shifts in the saddle comes a feeling of realism, because it's a feeling of movement. Even if in some cases it's not as realistic as it technically should be.
In some ways it's the same thing with overall indoor trainer road-feel realism. Sure, companies can replicate the inertia as best as possible, but even in the best of bikes and trainers I've tried, that doesn't mean it entirely tricks your brain into thinking you're outdoors. After all, you're still not dodging cars and having to fix flats. But each layer you add in does contribute to either increased enjoyment of riding indoors (especially long rides), or in some cases, increased ability to ride longer indoors if required (due to those micro-movements on the saddle).
In the case of KOM Cycling, they've found a strong middle-ground between the slightly higher-end Saris MP1 motion platform of similar overall feeling, while finding places to reduce the cost without sacrificing huge elements for most people. You can then take that $400 and spend it on other indoor cycling gear, or just a lot of Ben & Jerry's. Or a Trainer and Chill mug or t-shirt. Your call.
With that, thanks for reading!
Found This Post Useful? Support The Site!
Hopefully you found this review useful. At the end of the day, I'm an athlete just like you looking for the most detail possible on a new purchase - so my review is written from the standpoint of how I used the device. The reviews generally take a lot of hours to put together, so it's a fair bit of work (and labor of love). As you probably noticed by looking below, I also take time to answer all the questions posted in the comments - and there's quite a bit of detail in there as well.
If you're shopping for the KOM Cycling RPV2 Full Motion Rocker Plate or any other accessory items, please consider using the affiliate links below! As an Amazon Associate I earn from qualifying purchases. It doesn't cost you anything extra, but your purchases help support this website a lot. Even more, if you use Backcountry.com or Competitive Cyclist with coupon code DCRAINMAKER, first time users save 15% on applicable products!
Here's a few other variants or sibling products that are worth considering:
And of course - you can always sign-up to be a DCR Supporter! That gets you an ad-free DCR, access to the DCR Quarantine Corner video series packed with behind the scenes tidbits...and it also makes you awesome. And being awesome is what it's all about!
Thanks for reading! And as always, feel free to post comments or questions in the comments section below, I'll be happy to try and answer them as quickly as possible. And lastly, if you felt this review was useful - I always appreciate feedback in the comments below. Thanks!