Las pantallas de cristal líquido (LCD) son una gran opción de dispositivo de salida para mostrar caracteres alfanuméricos en tiempo real. También son muy útiles si su proyecto requiere una interfaz de usuario interactiva para la entrada de datos. Además, son de bajo costo, consumen menos energía que las pantallas LED, y le dan un aspecto más profesional a su proyecto.
Gracias a Ebedded Lab , hoy vamos a explorar cómo conectar un LCD personaje basado HD44780 a Netduino para mostrar caracteres alfanuméricos sin usar las librerías de Crsytal Liquid , que aun siendo muy potentes y utiles en ocasiones nos pueden dar algún problema .
Para más detalles técnicos del controlador HD44780, por favor lea la hoja de datos, así como su ejemplo de interfaz con chipKIT.
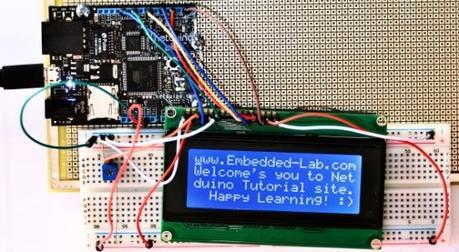
Configuración de Circuito y Teoría
La conexión de un LCD es realmente simple. El LCD funciona en modo de 4 bits, y por lo tanto los pines 7 a 10 (D0-D3) de la pantalla LCD no han sido utilizados. Los cuatro bits de datos más significativos, D4-D7 (pines 12 a 14), recibe datos LCD / comando a través de pasadores Netduino E / S 7, 5, 3 y 1, respectivamente. Del mismo modo, el Registro Select (R / S) y Enable (E) las líneas de señal de la pantalla LCD son impulsados por Netduino pins E / S 11 y 9, respectivamente. Pasadores LCD 1, 2, 3, 4, 15 y 16 están relacionados con la alimentación, ajuste de contraste y pantalla LED de luz de fondo, y están conectados apropiadamente como se muestra a continuación. Para entender cómo funciona LCD, tengo que apuntar a un documento diferente, ya que se explica mejor por allá. En Interconexión un LCD de caracteres, Raj explica acerca de la comunicación en el modo de 4 bits y también habla sobre los fundamentos de controlador HD44780 LCD. Para más detalles técnicos, consulte Hitachi HD44780U (LCD-II) ficha técnica.
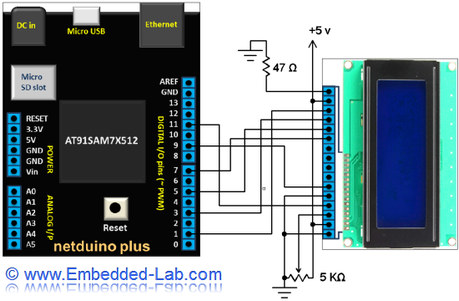
Conexión Con Netduino / Netduino Plus
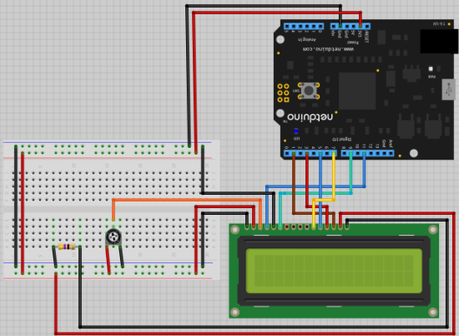
Programa en # .NET
Hay dos maneras en que podemos mirar el programa, uno de una manera muy sencilla y la otra manera, por supuesto, más difícil.
En forma más simple no nos preocupamos acerca de lo que hay dentro de la clase LCD (o una biblioteca) y no utilizar algunos de los métodos o propiedades expuestas. Echemos un vistazo a las cosas más simples primero:
  //configuracion del LCD compatible con HD44780 de dos lineas
 var lcdProvider = new GpioLiquidCrystalTransferProvider(
 Pins.GPIO_PIN_D8, // RS
 Pins.GPIO_PIN_D9, // enable
 Pins.GPIO_PIN_D10, // d4
 Pins.GPIO_PIN_D11, // d5
 Pins.GPIO_PIN_D12, // d6
 Pins.GPIO_PIN_D13); // d7
 var lcd = new LiquidCrystal(lcdProvider);

lcd.Clear();

 lcd.Begin(16, 2);
 lcd.SetCursorPosition(0, 0);
 lcd.Write("primera linea");// Print a message to the LCD.


 lcd.SetCursorPosition(0, 1);

 lcd.Write("segunda linea");
Como se puede ver que hemos creado una instancia de la clase LCD y luego establecemos algunas propiedades de lo que nos gusta y simplemente llamamos al método Write. Hay dos métodos escribir, uno mostrará el texto de la primera linea y el otro método mostrará la segunda.
Ahora vamos a profundizar en la parte compleja. Hay varias bibliotecas por ahí, pero yo escribimos mi propia para entender lo que se cuece dentro. Echemos un vistazo a la sección constructor,
 /*-------------------------------------------------------------------------------+
|
| Copyright (c) 2012, Embedded-Lab. All Rights Reserved.
|
| Limited permission is hereby granted to reproduce and modify this
| copyrighted material provided that this notice is retained
| in its entirety in any such reproduction or modification.
|
| Author: ANir
| First Version Date: 2012/12/27
+-------------------------------------------------------------------------------*/


using System;
using System.Threading;
using Microsoft.SPOT.Hardware;
using System.Text;

namespace EmbeddedLab.NetduinoPlus.Day2.Display
{
 public class LCD
 {
 #region Constructor
 public LCD(Cpu.Pin rs, Cpu.Pin enable,
 Cpu.Pin d4, Cpu.Pin d5, Cpu.Pin d6, Cpu.Pin d7,
 byte columns, Operational lineSize, int numberOfRows, Operational dotSize)
 {
 RS = new OutputPort(rs, false);
 Enable = new OutputPort(enable, false);
 D4 = new OutputPort(d4, false);
 D5 = new OutputPort(d5, false);
 D6 = new OutputPort(d6, false);
 D7 = new OutputPort(d7, false);

 Columns = columns;
 DotSize = (byte)dotSize;
 NumberOfLines = (byte)lineSize;
 NumberOfRows = numberOfRows;

 Initialize();
 }
 #endregion


 #region Public Methods
 public void Show(string text, int delay, bool newLine)
 {
 if (newLine) dirtyColumns = 0;
 foreach (char textChar in text.ToCharArray())
 {
 ResetLines();
 Show(Encoding.UTF8.GetBytes(textChar.ToString()));
 dirtyColumns += 1;
 Thread.Sleep(delay);
 }
 }

 public void Show(string text)
 {
 string[] splitedText = SplitText(text);
 Show(splitedText);
 }


 public void ClearDisplay()
 {
 SendCommand((byte)Command.Clear);
 currentRow = 0;
 dirtyColumns = 0;
 }
 public void GoHome()
 {
 SendCommand((byte)Command.Home);
 currentRow = 0;
 dirtyColumns = 0;
 }
 public void JumpAt(byte column, byte row)
 {
 if (NumberOfLines == (byte)Operational.DoubleLIne) row = (byte)(row % 4);
 else row = (byte)(row % 2);

 SendCommand((byte)((byte)Command.SetDdRam | (byte)(column + rowAddress[row]))); //0 based index
 }

 public void PushContentToLeft()
 {
 SendCommand(0x18 | 0x00);
 }

 public void PushContentToRight()
 {
 SendCommand(0x18 | 0x04);
 }

 #endregion


 #region Private Methods
 private void Initialize()
 {
 //initialize fields
 isVisible = true;
 showCursor = false;
 isBlinking = false;

 rowAddress = new byte[] { 0x00, 0x40, 0x14, 0x54 };
 firstHalfAddress = new byte[] { 0x10, 0x20, 0x40, 0x80 };
 secondHalfAddress = new byte[] { 0x01, 0x02, 0x04, 0x08 };

 currentRow = 0;
 dirtyColumns = 0;

 Thread.Sleep(50); // must wait for a few milliseconds


 // RS to high = data transfer
 // RS to low = command/instruction transfer
 RS.Write(false);

 // Enable provides a clock function to synchronize data transfer
 Enable.Write(false);


 // Set for 4 bit model
 Write(0x03, secondHalfAddress);
 Thread.Sleep(4);
 Write(0x03, secondHalfAddress);
 Thread.Sleep(4);
 Write(0x03, secondHalfAddress);
 Thread.Sleep(150);
 Write(0x02, secondHalfAddress);


 // Set the LCD properties
 byte operationalValue = (byte)((byte)Operational.FourBit | (byte)NumberOfLines | (byte)DotSize);
 SendCommand((byte)((byte)Command.Operational | operationalValue));

 UpdateDisplayOptions();

 ClearDisplay();

 byte entranceValue = (byte)Entrance.FromLeft | (byte)Entrance.ShiftDecrement;
 SendCommand((byte)((byte)Command.Entrance | entranceValue));

 }

 private string[] SplitText(string str)
 {
 if (str.Length > Columns * NumberOfRows) str = str.Substring(0, Columns * NumberOfRows);

 int stringArrayCounter = 0;
 dirtyColumns = 0;

 char[] charArray = str.ToCharArray();
 int arraySize = (int)System.Math.Ceiling((double)(str.Length + dirtyColumns) / Columns);
 string[] stringArray = new string[arraySize];

 for (int i = 0; i < charArray.Length; i++)
 {
 if (dirtyColumns < Columns)
 {
 stringArray[stringArrayCounter] = stringArray[stringArrayCounter] + charArray[i];
 dirtyColumns += 1;
 }
 else
 {
 dirtyColumns = 1;
 stringArrayCounter += 1;
 stringArray[stringArrayCounter] = stringArray[stringArrayCounter] + charArray[i];
 }
 }
 return stringArray;
 }


 private void ResetLines()
 {
 if (dirtyColumns == 0) return;
 if (dirtyColumns % Columns == 0)
 {
 currentRow += 1;
 JumpAt((byte)0, (byte)(currentRow));
 }
 }

 private void Write(byte[] data)
 {
 foreach (byte value in data)
 {
 Write(value, firstHalfAddress); // First half
 Write(value, secondHalfAddress); // Second half
 }
 }

 private void Write(byte value, byte[] halfAddress)
 {
 D4.Write((value & halfAddress[0]) > 0);
 D5.Write((value & halfAddress[1]) > 0);
 D6.Write((value & halfAddress[2]) > 0);
 D7.Write((value & halfAddress[3]) > 0);

 Enable.Write(true);
 Enable.Write(false);
 //Debug.Print("Wrote " + value.ToString());
 }

 private void SendCommand(byte value)
 {
 RS.Write(false); // command/instruction transfer
 Write(new byte[] { value });

 Thread.Sleep(5);
 }

 private void UpdateDisplayOptions()
 {
 byte command = (byte)Command.DisplayControl;
 command |= isVisible ? (byte)DisplayControl.ScreenOn : (byte)DisplayControl.ScreenOff;
 command |= showCursor ? (byte)DisplayControl.CursorOn : (byte)DisplayControl.CursorOff;
 command |= isBlinking ? (byte)DisplayControl.BlinkBoxOn : (byte)DisplayControl.BlinkBoxOff;

 SendCommand(command);
 }

 private void Show(string[] splitedText)
 {
 foreach (string text in splitedText)
 {
 JumpAt((byte)0, (byte)(currentRow));
 currentRow += 1;

 Show(Encoding.UTF8.GetBytes(text));
 }
 }

 private void Show(byte[] bytes)
 {
 RS.Write(true);
 Write(bytes);
 }

 #endregion

 #region Public Properties

 public bool IsVisible
 {
 get { return isVisible; }
 set { isVisible = value; UpdateDisplayOptions(); }
 }

 public bool IsBlinking
 {
 get { return isBlinking; }
 set { isBlinking = value; UpdateDisplayOptions(); }
 }

 public bool ShowCursor
 {
 get { return showCursor; }
 set { showCursor = value; UpdateDisplayOptions(); }
 }

 #endregion

 #region Fields
 private OutputPort RS;
 private OutputPort Enable;
 private OutputPort D4;
 private OutputPort D5;
 private OutputPort D6;
 private OutputPort D7;
 private byte Columns;
 private byte DotSize;
 private byte NumberOfLines;
 private byte[] rowAddress;
 private byte[] firstHalfAddress;
 private byte[] secondHalfAddress;


 private int currentRow;
 private int dirtyColumns;
 private int NumberOfRows;

 private bool isVisible;
 private bool showCursor;
 private bool isBlinking;
 #endregion


 #region Enums
 public enum Command : byte
 {
 Clear = 0x01,
 Home = 0x02,
 Entrance = 0x04,
 DisplayControl = 0x08,
 Move = 0x10,
 Operational = 0x20,
 SetCgRam = 0x40,
 SetDdRam = 0x80
 }

 public enum Entrance : byte
 {
 FromRight = 0x00,
 FromLeft = 0x02,
 ShiftIncrement = 0x01,
 ShiftDecrement = 0x00
 }

 public enum DisplayControl : byte
 {
 ScreenOn = 0x04,
 ScreenOff = 0x00,
 CursorOn = 0x02,
 CursorOff = 0x00,
 BlinkBoxOn = 0x01,
 BlinkBoxOff = 0x00
 }

 public enum Operational : byte
 {
 Dot5x10 = 0x04,
 Dot5x8 = 0x00,
 SingleLine = 0x00,
 DoubleLIne = 0x08,
 FourBit = 0x00
 }
 #endregion
 }
}
En la sección constructor, que básicamente crea cierta Outport, guarda las propiedades de LCD y luego llama al método Initialize. En este método, fijamos las propiedades visuales, inicializar algunas matrices y luego preparar la pantalla LCD para el modo de comunicación de 4 bits.
 private void Initialize()
 {
 //initialize fields
 isVisible = true;
 showCursor = false;
 isBlinking = false;

 rowAddress = new byte[] { 0x00, 0x40, 0x14, 0x54 };
 firstHalfAddress = new byte[] { 0x10, 0x20, 0x40, 0x80 };
 secondHalfAddress = new byte[] { 0x01, 0x02, 0x04, 0x08 };

 currentRow = 0;
 dirtyColumns = 0;

 Thread.Sleep(50); // must wait for a few milliseconds


 // RS to high = data transfer
 // RS to low = command/instruction transfer
 RS.Write(false);

 // Enable provides a clock function to synchronize data transfer
 Enable.Write(false);


 // Set for 4 bit model
 Write(0x03, secondHalfAddress);
 Thread.Sleep(4);
 Write(0x03, secondHalfAddress);
 Thread.Sleep(4);
 Write(0x03, secondHalfAddress);
 Thread.Sleep(150);
 Write(0x02, secondHalfAddress);


 // Set the LCD properties
 byte operationalValue = (byte)((byte)Operational.FourBit | (byte)NumberOfLines | (byte)DotSize);
 SendCommand((byte)((byte)Command.Operational | operationalValue));

 UpdateDisplayOptions();

 ClearDisplay();

 byte entranceValue = (byte)Entrance.FromLeft | (byte)Entrance.ShiftDecrement;
 SendCommand((byte)((byte)Command.Entrance | entranceValue));

 }
Ahora, echemos un vistazo a los métodos que son críticas para mostrar el texto a la pantalla LCD. El primer método Show nos permite mostrar la letra texto dado por carta como se puede ver el bucle está estructurado para cada carácter en el texto dado.
private void Show(string[] splitedText)
 {
 foreach (string text in splitedText)
 {
 JumpAt((byte)0, (byte)(currentRow));
 currentRow += 1;

 Show(Encoding.UTF8.GetBytes(text));
 }
 }
El segundo método Show muestra básicamente todo el texto a la vez, pero antes de que lo haga algún formato para que el texto aparecerá continuamente. Confía en mí mostrando texto dado de una manera continua es uno de lo difícil que resolví en esta clase LCD.
 private void Show(byte[] bytes)
 {
 RS.Write(true);
 Write(bytes);
 }
Por último, el método que escribe información en la pantalla LCD se realiza bajo el método de escritura. El primer método Write llama al método send Escribir pasa el valor de escritura y la dirección donde enviar la información. El segundo método de escritura básicamente escribe la información en la pantalla LCD.
  private void Write(byte value, byte[] halfAddress)
 {
 D4.Write((value & halfAddress[0]) > 0);
 D5.Write((value & halfAddress[1]) > 0);
 D6.Write((value & halfAddress[2]) > 0);
 D7.Write((value & halfAddress[3]) > 0);

 Enable.Write(true);
 Enable.Write(false);
 //Debug.Print("Wrote " + value.ToString());
 }
Producción
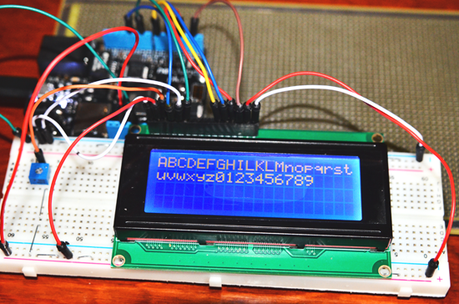
Después de conectar un par de cables, al ejecutar su código y visualizar el texto que usted quiere, pone una sonrisa en la cara. Dependiendo del método que está utilizando dará a obtener resultados diferentes Show, se mostrará letra por letra y otra mostrará el texto entero de una vez. Al igual que en el video, al girar el potenciómetro, los cambios de contraste de la pantalla.
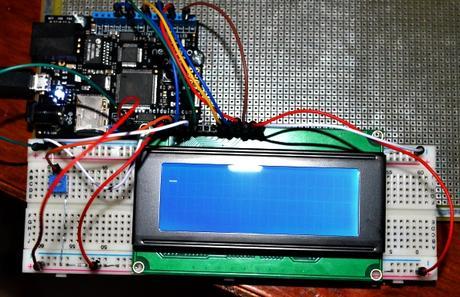
  public static void Main()
 {
 LCD lcd = new LCD(
 Pins.GPIO_PIN_D8, // RS
 Pins.GPIO_PIN_D9, // Enable
 Pins.GPIO_PIN_D10, // D4
 Pins.GPIO_PIN_D11, // D5
 Pins.GPIO_PIN_D12, // D6
 Pins.GPIO_PIN_D13, // D7
 16, // Number of Columns
 LCD.Operational.DoubleLIne, // LCD Row Format
 1, // Number of Rows in LCD
 LCD.Operational.Dot5x8); // Dot Size of LCD


 lcd.ShowCursor = true;
 lcd.Show("CRN", 200, true);
 Thread.Sleep(5000); // reading time for the viewer
}
Descargas
1) Código C # .NET (archivo Solution)
2) archivo Flitizing
Fuente aqui


